Enabling Direct Connect
To start using this feature, you can choose different approaches. For feature requirements, refer to Direct Connect Requirements.
Direct Connect
To start using this feature, take the following steps:
-
Download NAKIVO Backup & Replication installer or a VA with Transporter.
-
Install Transporter at the remote environment and set the master password during the installation. Alternatively, deploy Transporter VA in the remote environment. The master password for the VA can be set after the deployment.
Notes
-
For Windows, the installer UI and silent installations are supported.
-
For Linux, interactive and silent installations are supported.
-
For NAS, see the Supported NAS devices.
-
Master Password is required for Direct Connect Transporter installation.
-
-
-
If you didn’t set up the master password during the installer setup or if you have deployed Transporter VA, you need to generate a pre-shared key. This can be done at any time after the installation. Execute the following command in Transporter installation folder:
bhsvc -b “password” -
Restart the Transporter service after generating the password to apply the change.
-
Expose the Transporter port on the local machine to be externally available via the Internet.
-
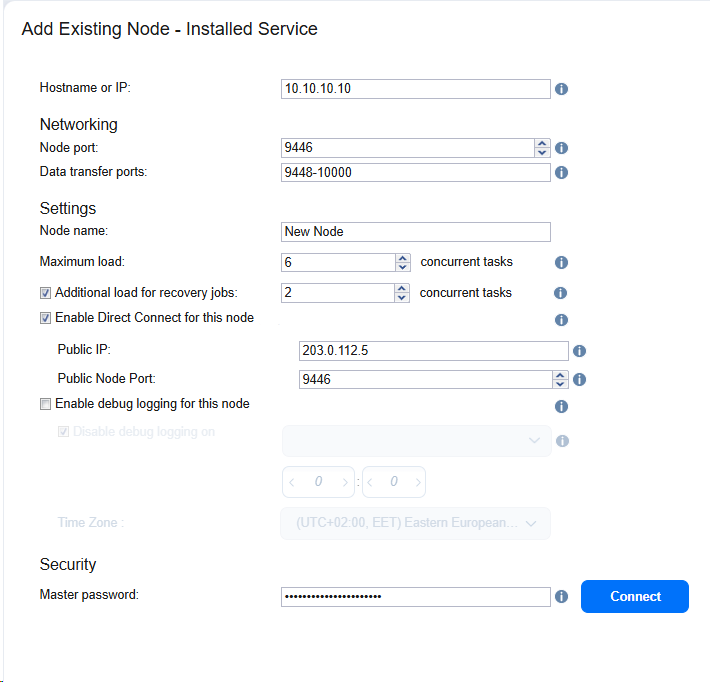
Add the Transporter to NAKIVO Backup & Replication by entering the Transporter details.
-
Select Enable Direct Connect for this transporter.
-
Enter Public IP and Public Node Port (IP and Port of the external MSP Transporter that is reachable from the internet and used for communication with the Direct Connect Transporter). Ensure that the entered combination of the Public Node Port and Public IP address is not used by other transporters.
-
Enter master password.
-
Click Connect.
-
View Transporter certificate information.
-
Accept received certificate.
-
Confirm adding the Transporter.
The client's Direct Connect Transporter is ready to be used for data protection activities.
MSP Direct Connect
To enable MSP Direct Connect, the Direct Connect Transporter must be installed on the client’s Windows/Linux operating system.
Installation and setting up the Direct Connect Transporter is performed according to the following flow:
-
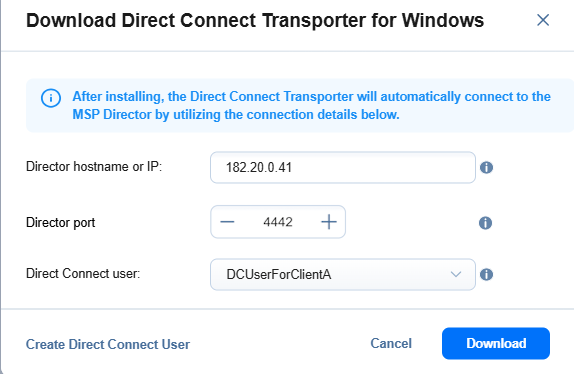
Go to Settings > Nodes, click Download, and select Direct Connect Transporter for Windows or Direct Connect Transporter for Linux from the drop-down.
Note
The Direct Connect Transporter for Windows / Direct Connect Transporter for Linux options are disabled if your current license does not support the MSP Direct Connect feature.
-
In the dialog box, set the installation options as follows:
-
Director hostname or IP field: Enter the IP address or hostname of the machine on which the MSP Director is installed. This should be an external address that is reachable from the Internet.
-
Director port field: Enter the MSP Director port used for communication with the Direct Connect Transporter. By default, port 4442 is filled in automatically, so make sure the port is open and not being used by other applications. This setting is global and can only be changed inside the master tenant Settings > System Settings > Configuration tab.
You can specify an external port that is reachable from the Internet instead of default value, for example:
-
Public port 10005 for TCP Port 4442 of MSP communication.
-
-
Direct Connect user dropdown: Click to select the user with the Direct Connect role. By default, the newest created user with the Direct Connect role is assigned.
Notes
-
This user is used to generate an application password required for authentication when the Direct Connect Transporter from the client site connects to the MSP Director. This option is disabled if no users with the Direct Connect role exist in the tenant.
-
To create a new user with the Direct Connect role, click the Create Direct Connect user link, and the Add Local User wizard that opens proceeds as described in Adding Local Users.
-
When the wizard is opened this way, the default value of the Role dropdown is set to Direct Connect and can’t be changed.
-
-
Click Download to start downloading the installer.
Notes
-
The Download button is disabled if the required dropdown/fields are not filled in or contain invalid values.
-
Optionally, click the Cancel or X button to close the dialog box without applying any changes.
-
-
After the Direct Connect Transporter installer is downloaded, run the installer at the client's site and follow the steps below:
Notes
-
For Windows, the installer UI and silent installations are supported.
-
For Linux, interactive and silent installations are supported.
-
Master Password is required for Direct Connect Transporter installation.
-
-
After the Direct Connect Transporter is installed successfully at the client’s site, the MSP Director automatically adds the Direct Connect Transporter to the Nodes tab of the local tenant from which it was downloaded.
Note
If the installer is downloaded from the Nodes tab from the master tenant UI, the Direct Connect Transporter will be added there.
-
The added Direct Connect Transporter is displayed with the Pending status in the Nodes dashboard of the local tenant instance or master tenant, depending on where the installer was downloaded from.
-
Hover the Pending Direct Connect Transporter, click Accept, and enter the configured Master password to accept the Direct Connect Transporter. The client’s Direct Connect Transporter is ready to be used for data protection activities.
Notes
-
To back up items from the client’s site to the MSP Repository, you must ensure at the MSP site, the MSP Transporter handling the backup must have Direct Connect enabled and be assigned to the MSP repository.
-
You cannot add the Direct Connect Transporter manually.
-
After the Direct Connect Transporter is installed, a config file is generated in the Direct Connect Transporter installation folder (activedc.conf). The activedc.conf file contains the following details about the connection to the MSP Director:
-
MSP Director hostname or IP
-
MSP Director port
-
Direct Connect user application password
-
MSP Director fingerprint
-
-
The following permissions are required to edit the activedc.conf file on Linux:
-
Owner: bhsvc
-
Group: bhsvc
-
Permissions: 644
-
-
If the Direct Connect Transporter does not appear in MSP Director after installation, check or modify this configuration file.
-
IP Whitelist Management
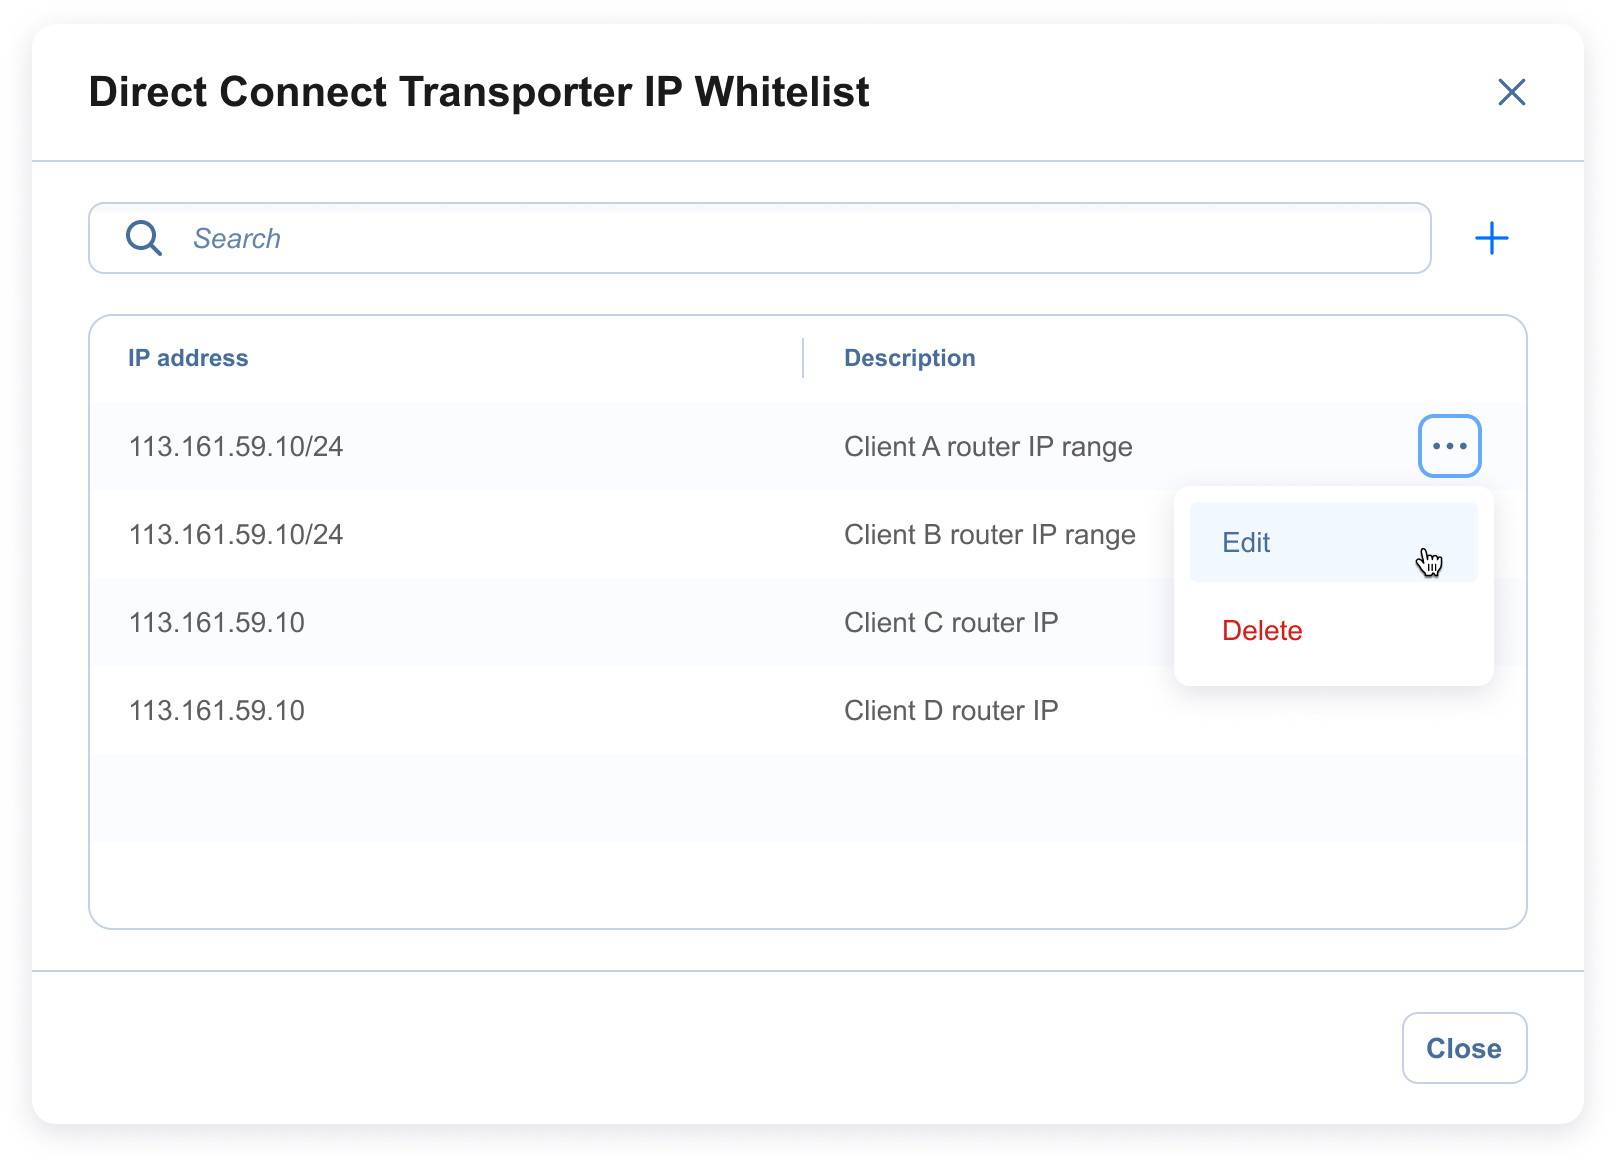
Only the Direct Connect Transporters from the specified IP addresses can connect to the MSP Director when enabled. If no whitelist is configured, any Direct Connect Transporter can connect to the MSP Director as long as its config file contains matching values (MSP Director IP, port, application password).
To do it, follow the steps below:
-
Go to the General > System Settings > Configuration tab.
-
Select the Allow Direct Connect Transporter connections from specific IP addresses only checkbox. The Settings link appears.
-
Click the Settings link.
-
In the Direct Connect Transporter IP Whitelist dialog box, click the (+) button to add the IP address to the whitelist.
-
Enter the required data and click Add. The IP address is added to the whitelist.
Notes
If the IP address was on the whitelist and you removed it, the Direct Connect Transporter from that IP address remains connected to the MSP Director until you manually remove it from the Nodes tab.
The whitelist can be configured at either the master tenant or the local tenant level, depending on where the Direct Connect Transporter will be added.