Using Email with Microsoft OAuth Authentication
This section explains how to configure Microsoft 365 so that NAKIVO Backup & Replication can send emails using OAuth 2.0 authentication. Follow the steps below before adding your Microsoft 365 credentials in the Email Settings.
Register an Application in Microsoft Azure
-
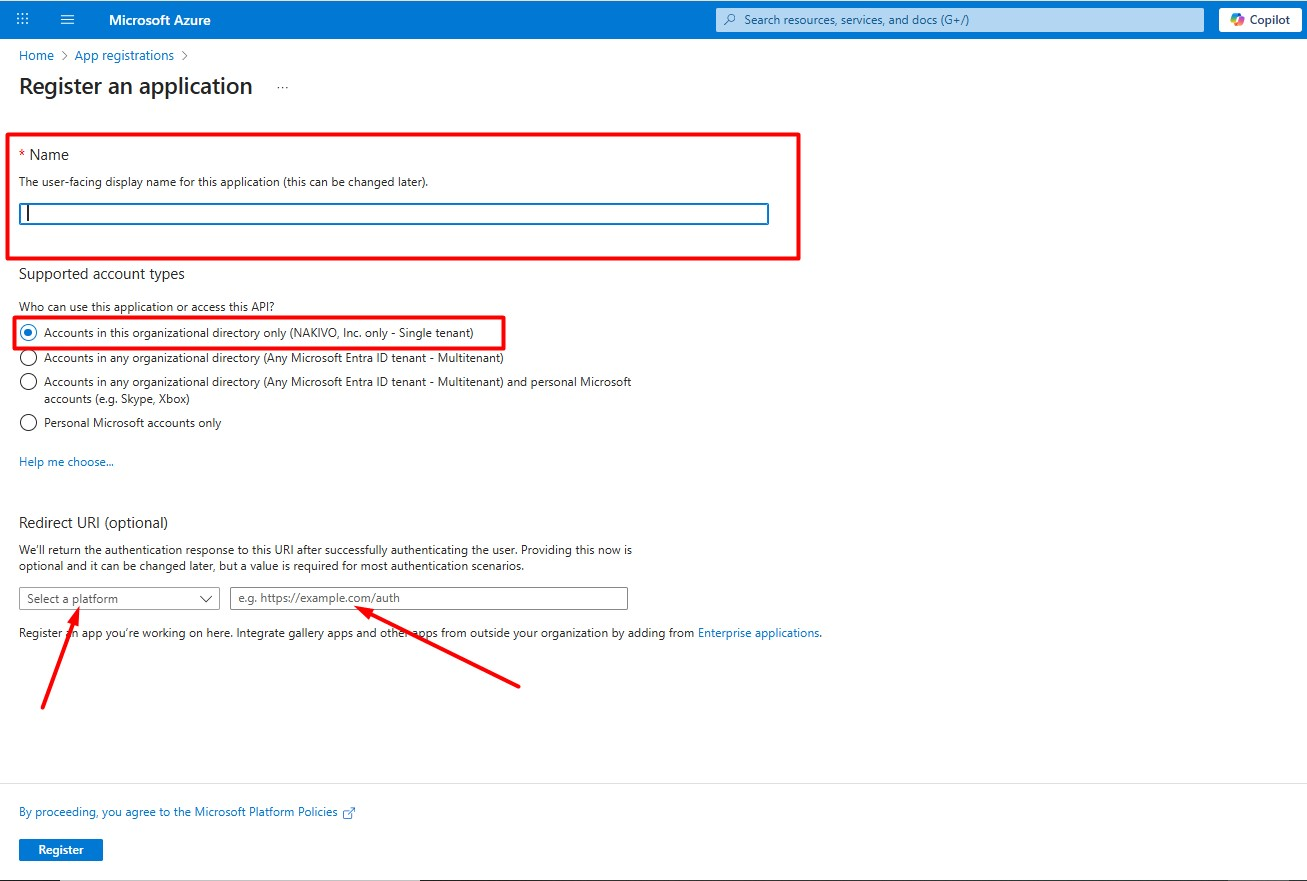
Sign in to your Microsoft Azure account and open the App registrations tab.
-
Click New registration to open the registration form.

-
Enter a name for the application.
-
Under Supported account types, select Accounts in this organizational directory only (NAKIVO, Inc. only - Single tenant).

-
In Redirect URI (Optional), select the Web platform and enter the appropriate URL based on how you access NAKIVO Backup & Replication:

-
https://localhost:4443/authorize – if accessing NAKIVO Backup & Replication locally inside the VM where it is installed.
-
https://127.0.0.1:4443/authorize – alternative local address.
-
https://<Director-IP>:4443/authorize – if accessing NAKIVO Backup & Replication remotely.
These URLs represent where Azure will send the authorization code after login. If you intend to authenticate using a client certificate, upload your certificate to Azure > App Registration > Certificates & secrets > Upload certificate before authorizing NBR.
Configure Authentication Settings
-
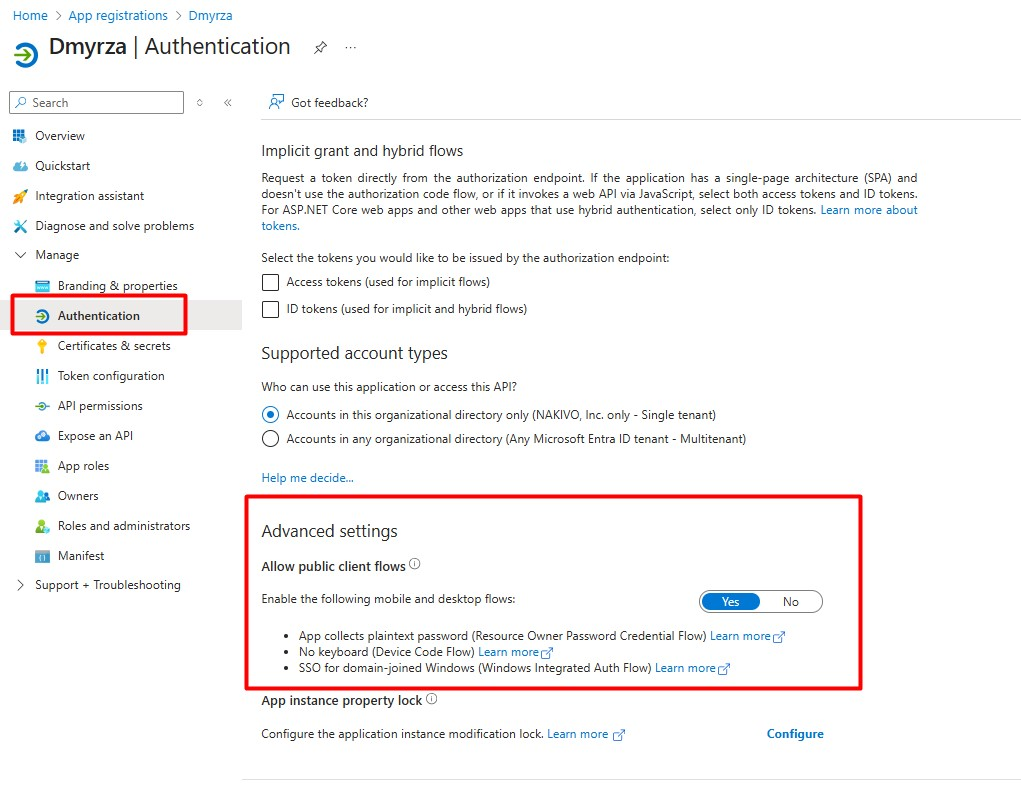
Go to Authentication > Advanced settings.
-
Click Yes to enable the flows.

-
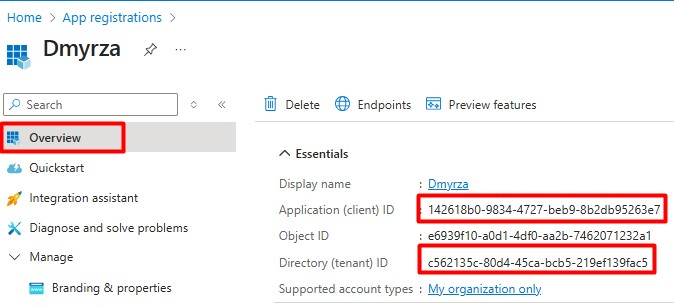
Go to Overview > Essentials and copy the following credentials to configure the Email Settings in NAKIVO Backup & Replication:
-
Client ID
-
Tenant ID

Authentication Settings
NAKIVO Backup & Replication supports two authentication methods. Please select one of the following:
-
Client Certificate (Recommended): This option is selected by default. To ensure successful authorization, make sure to use the correct certificate format for each system:
-
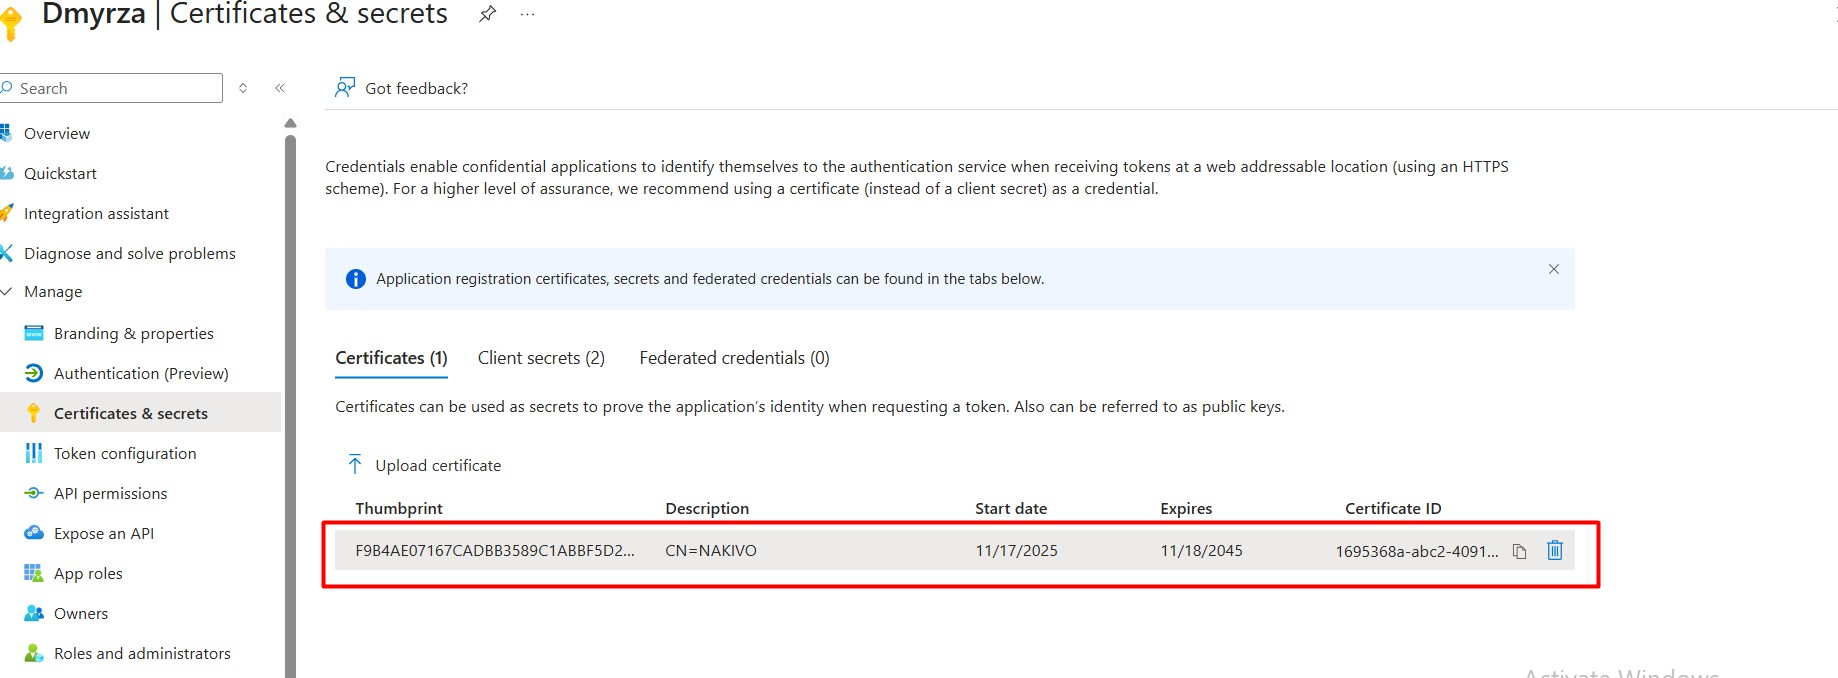
Microsoft Azure: Upload the public key (typically .pem or .cer) to the Certificates & secrets section of your App Registration.
-
NAKIVO Backup & Replication: Upload the corresponding private key (usually a matching .pfx file) to the Client Certificate field.
Note
To download or import certificates in PFX/PEM format from Azure Key Vault, ensure you have the appropriate permissions (Get, Import, and Download). Your Azure administrator may need to assign these permissions.

-
-
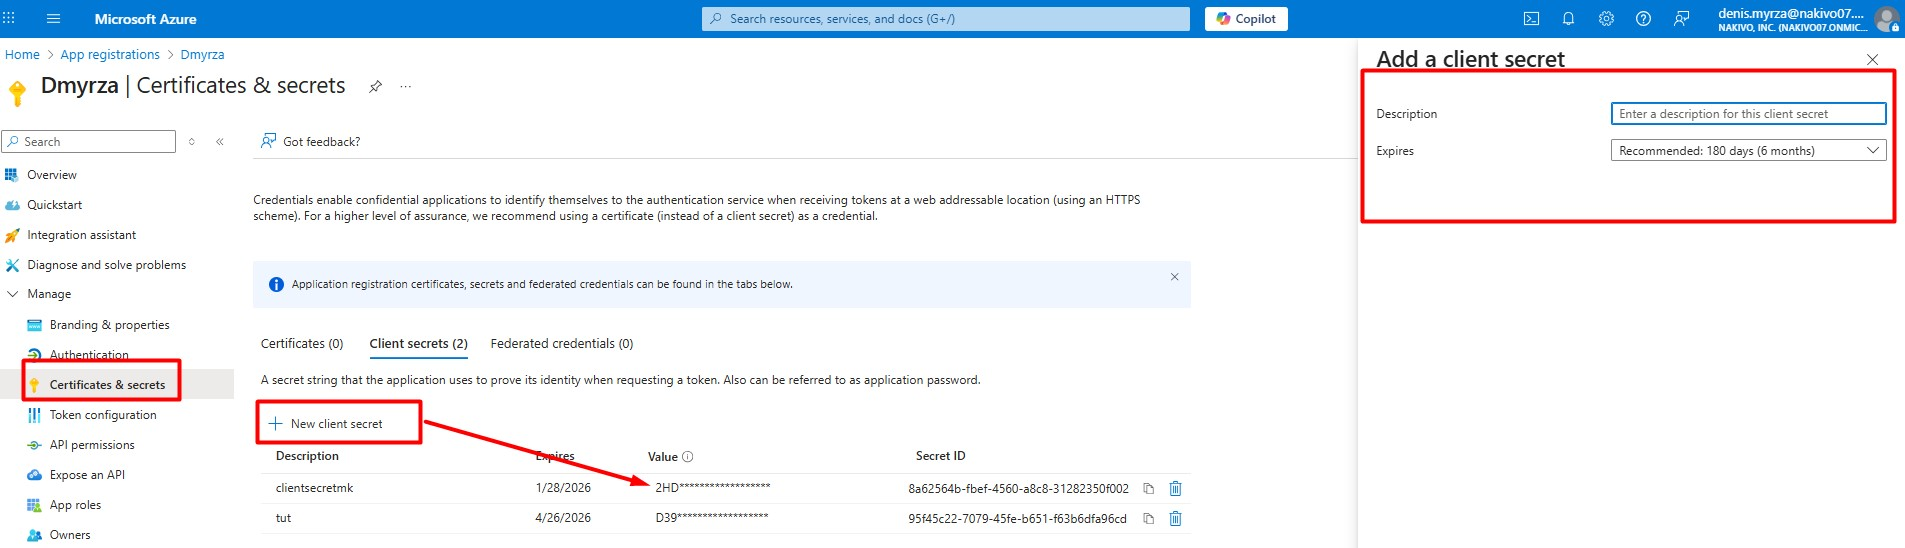
Azure Client Secret: If you prefer not to use a certificate, or if a valid Client Secret already exists, you can switch to this method (it will disable the Client Certificate fields). To generate a new secret:
-
In the Azure Portal, go to Certificates & secrets and click New client secret.
-
Specify a description and expiration period, then click Add.
-
Copy the generated value immediately and paste it into NAKIVO Backup & Replication.
-
Grant Required API Permissions
-
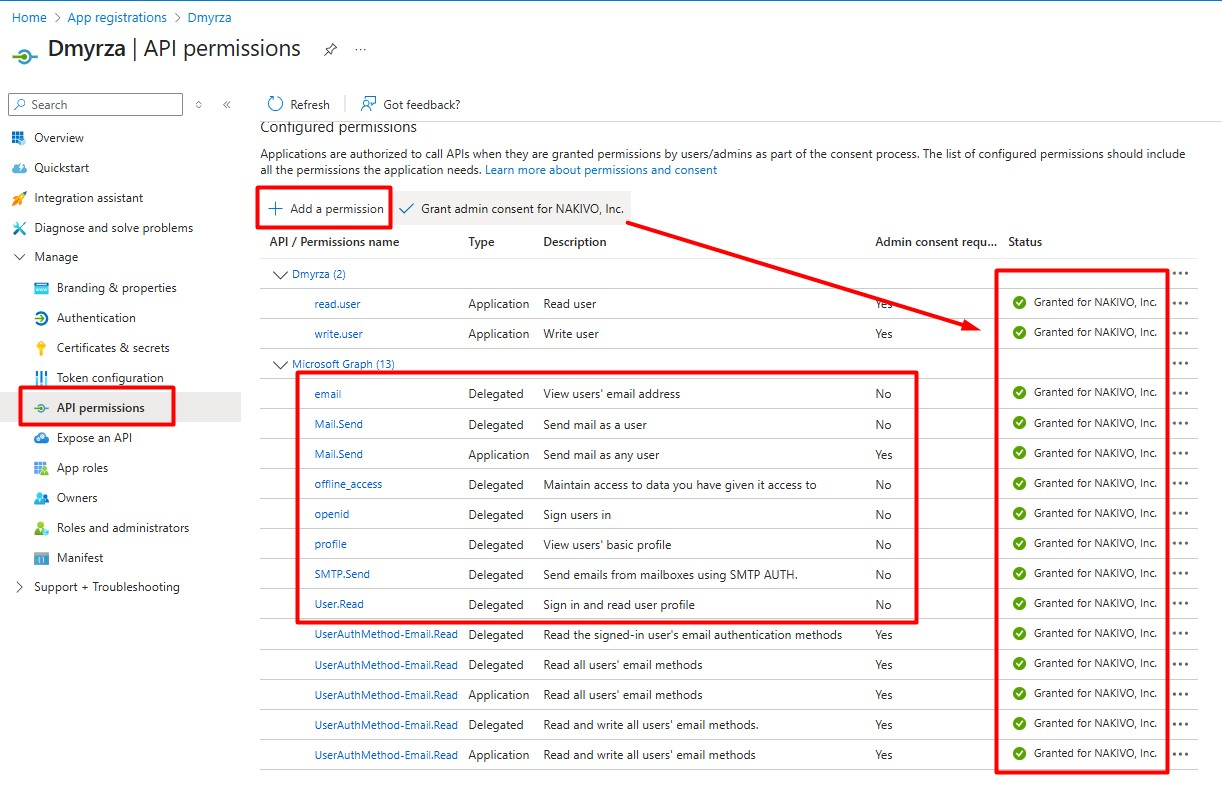
Open the API permissions tab.
-
Add the following Microsoft Graph permissions:
| Permission | Type | Description |
|---|---|---|
| Mail.Send | Delegated | Send mail as a user |
| Mail.Send | Application | Send mail as any user |
| offline_access | Delegated | Maintain access to data you have given it access to |
| openid | Delegated | Sign users in |
| profile | Delegated | View users' basic profile |
| SMTP.Send | Delegated | Send emails from mailboxes using SMTP AUTH. |
| User.Read | Delegated | Sign in and read user profile |
-
Click Grant admin consent to activate the permissions. For the full list of permission descriptions, refer to Microsoft Graph permissions reference.
Verify User Licensing
To authenticate SMTP via OAuth, the user account must have a valid Exchange-enabled license.
-
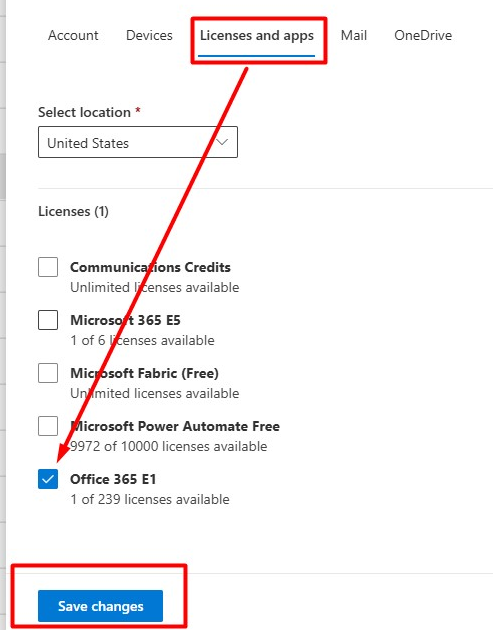
Open Microsoft Admin page.
-
Go to Users > Active users.
-
Select your user and verify the License status.
-
If the account is Unlicensed, assign Office 365 E1 or any other plan that includes Exchange Online.
Note
This is required to connect Exchange and the Authenticated SMTP function.
-
After licensing, reload the page.
-
Open Mail > Email apps and click Manage email apps.
-
Ensure that Authenticated SMTP is enabled for the user. For more information, refer to Enable or disable authenticated client SMTP submission in Exchange Online.

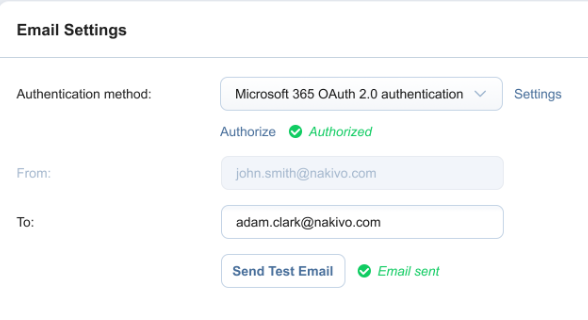
In NAKIVO Backup & Replication
-
Navigate to Settings > Email Settings.
-
Under Authentication method, select Microsoft OAuth 2.0 authentication.
-
Enter the following information:
-
Client ID: Enter the unique identifier generated with your Microsoft 365 account when you create OAuth 2.0 credentials.
-
Tenant ID: Enter your Tenant ID (your Tenant ID is displayed in the Tenant information section in Microsoft Entra Admin center).
-
Client Certificate: Choose a saved certificate from the drop-down list to use an existing certificate. If you don’t have any saved certificates or want to generate a new one, click Manage certificates and create a new certificate. Make sure that the downloaded certificate file has the .cer format.
-
Client Secret: Select and enter the Client Secret, generated on the Microsoft Azure portal.
-
-
Add the certificate to Microsoft Azure > App Registration > Certificates & secrets > Upload certificate.
-
In Nakivo Backup & Replication, click Authorize now to get access to your Microsoft 365 account through OAuth 2.0 authentication.
-
Enter the email address in the To field.
-
Click Send Test Email to confirm that the configuration works.
Note
If OAuth settings are incomplete or Azure permissions are missing, sending a test email from NAKIVO Backup & Replication may fail. Complete all Microsoft 365 configuration steps before attempting authentication.